

HOW TO USE MOBILE PRESETS in Adobe Lightroom!
This tutorial will walk you through how to download and install the mobile presets on your phone! If you are not very tech savvy, this can feel a little daunting - but once the preset is installed in Lightroom, it will be easy to use! Getting it installed is the most complex part.
Also - if you purchase more than (1) Preset, you will need to install each of them. It will be easiest to do them 1 at a time, so that you won't get them mixed up & also, after you do the first install completely - the rest will be easy because you will know exactly what you are doing!
***For a video tutorial on how to do this easily, there is a full video on my Instagram! ***
www.instagram.com/KelseyLynnePhoto
Step 1 : Download Adobe Lightroom onto your Mobile Device (it is a free app)

Step 2 : Click the link in your confirmation e-mail to download the Preset to your phone!
IMPORTANT : If you are opening the download e-mail through the GMAIL app - the download will not work until you open the download page in either Safari, or Google Chrome, or a web browser! On an iPhone - you can click the compass in the bottom corner & it will pop open in Safari!!!! On an Android, you can copy & paste the link into your web browser.

Once you click "Download Now" - you need to wait about 1-2 minutes for the preset to actually download. Then the following image should appear.
Click : More to "Save Image" to your Phone.

Save the .DNG file to your phone. If you purchased the preset on your computer and downloaded it there, you need to either AirDrop the .DNG file to your phone - or send it to yourself by e-mail or DropBox.
You can also save it to your "Files" - but just remember where you save it to, because you will need to find the file to import into Lightroom!

Step 3 : Open the Lightroom App on your Phone and create a "New Album" this will be where you import your .DNG preset files to - to save the presets on your phone. You can name the album wherever you want. Something simple like "Presets" or "KLP Presets" will be helpful for the future!

Step 4 : Click on the New Album (KLP presets) that you have just created. Once you are in the album - Import the .DNG file to it.


Step 5 : Click the DNG File (it might just look like a grey square in your camera roll) you want to work with & create the preset for.

Step 6 : Once the file is imported - click on it! Then click on the … at the top right of the screen!


Step 7 : Click the "Create Preset" button.

Step 8 : Name the Preset & leave all of the boxes the way they were.

Step 9 : Click the check mark in the top right of the screen & your preset has been created!
Step 10 : Go back to your main Lightroom page & import an image you want to edit! Open the image in Lightroom.

Step 11 : Scroll over to "Presets" on the bottom navigation bar (it is at the far right) & click on the preset you want to use!


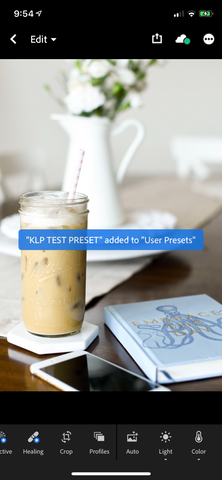
ALSO : When you click on Presets - you need to make sure you are viewing the "User Presets"! If you look at the photo below, you will see where it says "User Presets" with a downward arrow? Make sure that is on USER PRESETS - if it says anything else, just click the arrow & click on User Presets.

Step 12 : Save the Image to your Phone & Post wherever you want!


Step 13 : Start over from Step 10 for any new images! Watch and see how easy it is!!! Once you get the hang of it, it will take you less than 1 minute for a gorgeous image!
Step 14 *Extra Credit* : Use the Hashtag #KLPPresets and tag @KelseyLynnePhoto so I can see all of your gorgeous images!